Tag Archives: weeds

Birthday Present

My son & his wife gave me a birthday present of a ‘Calla Lily’ (Zantedeschia rehmannii) which has dark purple, almost black, spathes. It’s about 30cm (12ins) high. For the time being it will stay on our living room table but in a couple of weeks it may well go outside onto our balcony for the summer.

I’ve never grown this plant before so I’m looking forward to growing it & seeing if I can keep it for a couple of years. I’m always loathe to throw away plants. I like to propagate them as well. It’s rare the plant I can’t get to reproduce in some way! Some propagate so easily they end up almost becoming weeds!

This last photo was taken on 26th May but it seems I’ve forgotten to put the date on it!

Geranium & Fuchsia cuttings from our son

Geranium & Fuchsia cuttings from our son

Today I planted some Geranium cutting I got from our son yesterday. His wife bought some small plants from a cut price supermarket in town in the spring. I liked them very much & they seemed to be quite vigorous plants so I asked him for some cuttings. They have 4 plants & I took 2 cuttings from each of them but one I couldn’t find a 2nd branch, without flowerbuds, which I could have taken.

Geraniums:

We went out into the garden & I showed him how to take cuttings. I trimmed them, roughly, while still with our son in his garden so that I could show him how to take cuttings. As this is his 1st year ever with a garden of his own he knows very little about gardening! He is quickly becoming a “chip of the old block”! :-)) He is showing quite an interest in growing plants & attending to those they have found growing in their garden.

They are now just discovering what’s in the garden as they moved in during November 2015 so this, being their first year, is turning into quite an adventure for them! They have had some help from their 3 year old daughter who loves going round the garden pulling up the weeds – I don’t know if she has pulled out cultivated plants thinking they were weeds as yet.

I also took 4 cutting from a lovely Fuchsia they have growing in a big pot outside their French windows.

Fuchsia in August:

Fuchsia in September:

This is a very nice looking Fuchsia & I put the cutting, together with the Geranium cutting, in an electrically heated propagator, while the Geranium cutting don’t really need the heat I thought it might speed up the rooting of the Fuchsia cuttings.

This is his first year ever with a garden so he has a lot to learn! He asks me for advice from time to time & I try to explain to him some of the things he needs to do. When we go to visit him & our granddaughter we always spend a while in the garden & he asks me things about the plants he has & I explain other things too.

Update on allotment

Update on allotment

Here is an update (of sorts) to Gerry’s allotment plot 58 during the 2016 growing season which is drawing to a close now that we are in September & the start of autumn is only a couple of weeks away now.

I’ve actually spent very little time on the allotment this year owing to a number of different reasons chief amongst them being a 3 week stay in Spain. No, not a holiday unfortunately, my wife’s family lives over there & her mother is very ill & may soon pass away. My wife’s sister is normally her carer but she had urgent business that couldn’t be put of for any longer so we agreed to take her place caring for their mother for a few weeks. This was during July, the middle of the growing season in the UK.

Just before going off to Spain I sowed 3 rows of Beetroot Mixture seeds in the raised bed in front of the greenhouse. In fact that day I sowed many more seeds than I have ever done before thinking that I could thin them out once we get back from Spain. Unfortunately when I was able to get down to the plot, a few days later after our return, I found that none of the seeds had germinated! Of course I was upset about that as the previous crop of Beetroot had bolted & Gerry had pulled them out. It was beginning to look like I wouldn’t get any Beetroot this year!

Bolting Beetroot:

The crop that had bolted was from the same packet of seeds that I sowed in the greenhouse earlier in the year. I know some people say you should sow them in situ but I’ve been sowing a few crops of beetroot in the greenhouse & then transplanting them to the allotment for some years now & have had better results that way than sowing direct.

The other half of the raised bed had onions from sets that I’d planted out earlier in the year. These were doing very well. There were few weeds amongst them & these were dealt with quickly.

Onions just planted out in raised bed:

Onions growing very well in June:

Onions just harvested:

Last year I had grown potatoes in the raised bed, (once they were finished & had been dug up I put in horse manure & compost in the half where the onions grew), I was sure I’d dug them all out but no, I obviously missed quite a few as there were lots of potato plants, in rows, growing amongst the beetroots & onions!

Beetroot Mixture just harvested:

I had to let them grow as it would have meant disturbing the onions & beetroots.

When I lifted the onions I found about 1/3 of them had a fungus disease, possibly White Rot, as the basal plate showed a rotting mass of white “fluff”. If that was the cause it will mean the bed can’t be used for any of the Allium family for at least 10 years! Which means Garlic, Leeks, Spring onions & of course onions themselves can’t be sown in it any more! I mentioned this to Gerry & he said a few of his onions, that he had sown before Christmas 2015, had had the same problem. I said we will have to put some kind of permanent marker on the beds to remind us about this as we are bound to forget at some time during the next 10 years that we shouldn’t put any crops from the Allium family in these beds.

Potatoes:

I didn’t sow any potatoes this year but Gerry sowed several beds of them in different places on the plot.

He has since harvested some but others he has left in the ground so as to harvest when he needs them. He told me the results hadn’t been too bad as I’ve not seen them.

Runner beans:

His runner beans at the very top of the plot don’t seem to have done nearly as well as other years when he has had far more than he could use.

Beetroot:

He sowed a row of Beetroot seeds rather thickly but has never thinned the seedlings out with the result being that they are a long thick clump of leaves &, I imagine, little root! At least his germinated & grew!

Cabbages:

He planted out some cabbages seedlings he had started off at home while I was away.

Cabbages at top of plot:

Brussels Sprouts near greenhouse:

Unfortunately the plants have been stripped bare of leaves by the Great White’s caterpillars! The same has happened to his Sprouts, planted in the bed in front of the greenhouse! These he had covered with netting but still they managed to get in & he has been left with skeleton-like leaves.

Dwarf French beans:

He planted out Dwarf French beans also while I was away but I don’t think they did very well.

Broadbeans:

Butternut Squashes:

Gerry has decided to get rid of the bed of Raspberry canes alongside the greenhouse but he doesn’t seem to have decided yet just what he will put in their place next year. So this year there will be no Raspberries just as there have not been any Strawberries either. The bed at the bottom of the plot that I made up a few years ago had become so overrun with Bindweed it was practically impossible to get any fruit from it last year & this year I removed the black plastic sheeting I put down when I planted out the rooted runners later Gerry applied weedkiller to the whole bed. Next year he wants to plant something different there.

Gooseberry bushes behind shed:

He has also cut back, quite severely, the overgrown Gooseberry bushes behind the shed which obviously means that there will be no Gooseberries from the 6 bushes next year.

Yet the other 6 bushes near the top of the plot he hasn’t touched though they are probably in a worse condition. Perhaps he didn’t want to lose ALL his Gooseberries next year!

The Black & White Currant bushes near these Gooseberry bushes are also very overgrown & are in need of some TLC!

Asparagus:

Gerry has several Asparagus beds on his allotment but he has one plant that is bigger than any of the others & that is located at the very bottom of his plot.

Plums:

There have been next to no plums at all this year. The Yellow Plum tree, (he now only has the one having given up his half plot where there were several trees), has had very few plums this year the same as his two Victoria Plum trees at the top of his plot. Last year they had the best crop I’d seen on them since I started helping him about 8 years ago. He also has a black plum tree he thinks is called ‘Black Czar‘. It had masses of flower in the spring but has produced just ONE plum this year! Like the other fruit trees last year it had a tremendous crop of plums! There must have been a late frost as all the fruit trees had a very bad production this year unlike last year’s which was record breaking!

Apple tree:

Yet the apple tree over the shed, a cooker, possibly Brambly Seedling, has done much better again this year!

Last year the crop was the worst I’d ever seen since I’ve worked on the plot. Again I imagine it is the fault of the weather. Last year March, & April, especially, were fantastic months for fruit tree pollination whereas May was a poor month with lots of very cold weather. Just the opposite of this year’s weather.

Well that about sums up the allotment plot this year. As you all know I gave up my own allotment plot (Plot 12A) last year, in September, as I couldn’t manage it & help Gerry & attend to all the other demands on my time. As you can see I’ve done very little work on Gerry’s plot this year but fortunately his health has been much better & he has been able to do a lot more than for some years. Giving up his other, half allotment plot, has also freed him up more time to concentrate his attention on his main plot.

Well that’s all for now I don’t know if I will write another account on the plot this year, it seems unlikely as the season is drawing to a close.


Giving up!

Giving up!

As of September 2014 I’ve given up my half allotment, Plot 12A, as I couldn’t spend nearly as much time as I needed to on it & the needs of our daughter & grandchildren have also restricted my time there. A third reason is that we don’t get much out of it as neither my wife nor I are keen on many vegetables that can be grown on it. We only really like potatoes, tomatoes, lettuces, sweet peppers, cucumbers, beetroot, onions, garlic & strawberries.

Plot at beginning of September 2014:

We were ending up with gluts & deficits – especially with lettuces as, for as much as I try to stagger them, the weather seldom played ball & I’d end up with gluts that couldn’t be used or even given away! We thought it didn’t make sense to continue to pay out for a plot that is getting more expensive every year & could only be used for less than 6 months a year.

The orange fencing marks the end of the plot or the division between plots 12A & 12B.

Nevertheless it’s not the end to my allotment growing as Gerry has told me I can grow some things on his 1 & 1/2 plots. That’s how I started out in 2010, helping him. It was he who encouraged me to apply for my own plot! He has supported me during these years in letting me use his greenhouse on the plot & using his shed & tools. In turn I’ve tried to help him on his plots at the same time.

This past summer saw a big struggle in maintaining his plot & mine as well at the same time. Having even less time on the plots made both our plots suffer & once weeds start to get the upper hand it’s an uphill fight against them which they seem to win most of the time.

On August 1st Gerry had to go into hospital for a major operation which saw him on the op table for 9 hours! He is now recovering well but it will still be a few months till he regains his former strength. It won’t be till next spring that he will be able to work on his plots again & at that time I will help him again.

I’ve added a few photos of views of the plot I’ve given up, some were taken at the beginning of the month some just a few days ago. These will obviously be the last pictures I will be taking of Plot 12A.

Plot 12A Beds being dismantled:

As you can see from these photos I’ve started to dismantle the raised beds that my brother & I put up 3 years ago.

Since the pictures were taken I’ve finished the dismantling & today my wife (she very rarely sets foot on the allotments!) & I took down the runner bean plants while she foraged around for the last of the beans. If I can get down tomorrow I’ll take the canes down & return them to Gerry who kindly lent me them.

I’ve also got two teepees of runner beans to take down yet & when they are finished that will be the end of my dismantling of the plot.

Thanks to many of you who gave me encouraging comments & their support over these past 3 years. I very much appreciated them! 🙂 Thank you all for putting up with my, more or less, monthly blogs on our allotments as well.

But … you won’t be getting off too lightly as I will be back with more blogs on the allotments – when I can’t be sure but I’ve sufficient photos from Gerry’s plots to make up several blogs!

Cambridge Botanical Gardens (Compost Corner) 2

Cambridge Botanical Gardens (Compost Corner) 2

This is a continuation of the previous blog on composting.

What a lot of hot rot!

Hot composting

This is a good option if you have a large garden or lots of material, as you build the pile in one go. It’s faster than the cool method – you should have compost within 6 months.

The heat generated kills many of the weeds & seed in the pile. Like cool composting you need a balance of green & brown biodegradable material, as well as moisture & air.

How do I start?

1. Make or buy a bin. A double bin is needed as you can turn the pile from one to another. Collect together material, avoiding things like branches – they take too long to decay. Ideally shred or chop your waste into small pieces. Fill 1 bin with an even mix of greens & browns. Within a few days, bacteria start decomposing the material, breaking it down. This activity can make the heap too hot to touch. If it feels dry at any stage, add water.

2. When it has cooled down, turn the heap into the next bin. This adds air which speeds up bacterial activity making the pile heat up again. It also moves in uncomposted material from the outer edges.

3. After the temperature has peaked & dropped again, turn the material back into the first bin. The process will restart. Do this every couple of weeks until the material fails to heat up. If you leave it now insects & worms will move in & break down the compost even more.

Clever converters

Plastic converters are another alternative for home composting. They are tidy, save space & speed up decay by keeping the contents warm.

1 or 2 converters would be enough for an average household.

What can I compost?

The ingredients are the same as for cool & hot piles. Your main sources are kitchen & garden waste. Aim for an even mix of ‘Greens’ (such as un-cooked vegetables & fruit waste, grass, weeds) & ‘Browns’ (like card, paper, straw, twigs, dead leaves).

Starting from scratch

1. Choose a warm place to put your converter, preferably on soil. If you break up the surface before you putting the converter in place, it will help with drainage & allow worms, insects & fungi to move in & out of the heap.

2. Add your materials in loose layers of greens & browns.

3. You can turn your pile occasionally to mix materials & add air. This will speed up the process.

4. Keep the compost damp by adding grass cuttings, vegetable waste or small quantities of water.

How long does it take?

Up to 6 months, depending on the materials you put in & the temperature of in the container.

The converter contains material at all stages of decomposition. The compost usually collects in the bottom layer. It is ready to use when you can no longer tell what the original material was.

No thanks!

Remember to avoid meat, fish, dairy products. cooked foods & things that don’t decompose.

Leaf litter

Fungi rot down dead leaves & turn them into a rich compost called leaf mould.

Beech leaves are the best for making leaf mould. Some leaves (like Plane & Chestnut) are slow to decompose. You could shred them to make to make the process quicker or just leave them out.

If you put deciduous leaves in a compost pile with other waste material, they can take time to rot down. So if you have large quantities of leaves, pile them up & leave them instead. They will produce a good quality compost without you having to do anything else. Autumn is the best time to start leaf composting.

How to make leaf mould

1. You could use a leaf bin. Fill the bin with leaves, squash then down & sprinkle them with water if dry. Don’t add leaves of evergreens such as Holly, Laurel & Conifers. These go on the compost heap where bacteria will gradually break them down.

2. Leave the pile – there’s no need to turn it. Fungi will soon start to break down the damp carbon-rich leaves.

How do I know when it is ready?

When the original leaves have turned into a dark-brown crumbly material. This takes about a year, but it is worth waiting for. Leaf compost makes an excellent mulch. It also improves soil or can be added to potting compost.

That’s part two which I hope you will find as interesting as Part 1.

In a day or two I shall do the final part of the blogs on composting.

This is a repost of a blog I wrote 4 years ago!

The October Plot

The October Plot

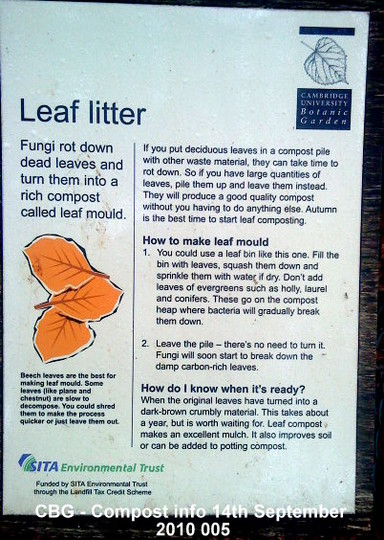
The October plot is quite a different plot from the September plot! It’s very noticeable that the days are hurrying towards their shortest time in December. Everything is shutting down now, the leaves are falling off the trees (time to collect them & compost them for leaf mould!) & most plants will have been harvested before the end of the month.

Talking about harvesting, here are a few photos of my harvesting results:

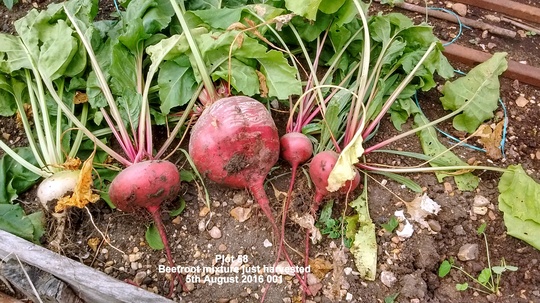
Beetroot Bolthardy just harvested:

I’ve now lost count of the number of times I’ve sown & harvested beetroot this year! I was even allowed to pull up some from the lady’s plot across the path. She said she had asked several other people if they would like some but they had plenty of their own! She happened to ask me at a time when I was between crops of mine.

Cucumber Marketmore just harvested:

I’ve been able to harvest quite a few cucumbers in spite of the powdery mildew that has covered them all growing season! I had greater success in the greenhouse than out on the plot! Does anybody know of a variety that is more resistant to this mildew?

Sweet Peppers harvested:

I am rather disappointed with the Sweet Peppers, these all came from the plants I grew from the seeds my wife brought me back from Spain last year. I’ve come to the conclusion that these Peppers are of a small variety & not like the big ones we get in the supermarket! Only a very few were longer & thinner the majority, as you can see in the photo are not much bigger than a thumb! These came from the bed of around 70 plants!

The Sweet Peppers in the photo below grew in the other half of the 3 Sisters’ bed. There were around 40 plants in this bed. There were less Peppers even though the plants looked stronger!

Sweetcorn harvested from 3 Sisters’ bed:

Gerry took these home but he hasn’t mentioned to me anything about them!

Sweetcorn F1 Incredible harvested:

I took these home but as I wasn’t able to cook them immediately I forgot about them in the fridge for a couple of days! I eventually got around to cooking & eating them – nothing much to say about them – perhaps as I didn’t use them earlier they had lost some of their sweetness. I’ve heard that Americans will even go so far as to take a pan of boiling water down to the plants & pop the cobs into the water within a minute of harvesting them!

Tomatoes Mallorquin from GH just harvested:

These came from the most ripe truss at that moment. I took them off to give the rest time to ripen a little more before the weather became too cold:

Here you can see how much just 1 truss weighed when I got them on the scales at home:

Tomatoes Self-sown from greenhouse:

How this plant got in here I’ve no idea! Obviously a seed came from somewhere & germinated in the soil between the concrete slabs that run down the centre of the GH & the plastic that covers the ground where I have the growbags with the tomato Mallorquin & the Cucumbers. It doesn’t look like any of the three varieties that Gerry & I grew last year. (Alicante, MoneyMaker & Gardener’s Delight).

Tomatoes Gardener’s Favourite harvested:

These Toms came from self-sown seed that somehow survived the winter in the soil. This was the only one to be harvested of the several plants that escaped my attention till they were too big to pull up (Yes, I’m a big softy at heart!). I spent much of the summer pulling up these weeds as they came up amongst my Sweet Peppers! The Sunflowers were just as bad as well! They kept popping up all over the place!

Tomatoes Mallorquin:

These were harvested from the GH a couple of weeks after those in the previous photo. As you can see it was well worth picking those before to let these ripen! I still have a couple of trusses more waiting to be picked.

Amaryllis Red with white stripe:

This was just waiting for my return from a 2 week absence from the plot! We went to visit my wife’s family & our 2 sons for 10 days & on my first day back on the plot, Sunday, just to water the plants in the GH, I noticed a red splash which on investigation turned out to be this Amaryllis! I hadn’t noticed the bud when I watered the pots with tomato fertilizer the day before leaving for Spain!

Fig tree:

Up until recently this Fig tree was hidden amongst the autumn fruiting Raspberries. While I was away it had grown a little higher & was now visible. No figs to pick though as the very late frost we had in May, coinciding with a similar trip to Spain, (only 4 days though),killed all the growth they had put on & last year’s brevas, as the immature figs are called, so nothing for this year. Hopefully we will get some for next year as new growth next year will be protected by fleece!

Lettuce Tom Thumb just planted out

It may seem strange to plant out Lettuce so late in the growing season, now coming to an end, but I noticed that last winter they survived the heaviest frosts we had as well as all the snow & ice. So I thought they will be able to survive a few light frosts as we were bound to have some warmer days before the real winter cold set in. What I didn’t expect was that we would have daytime temps around 13-15ºC at the end of October!

Peanuts:

I have no idea if Peanuts are frost hardy, I doubt it but my plants have survived the first very light frost we had on the night of October 14th! A frost forecast for the 21st didn’t happen! Phew! So these are still growing! I have no idea what size plants they normally make or if there are any peanuts in the soil beneath them. I’ll find out shortly.

Pinto & Garbanzo beans & Lentils:

These Legumes, as this family of plants is called, are still doing quite well. The Pinto beans are very susceptible to frost, more so than runner/green beans. The light frost of the 14th damaged many of the plants but didn’t kill them outright. The next day I made it my first duty to go around the plants & pick as many pods as I could. But I ended up pulling up the plants as it was quicker & I put them in the GH to dry off till I can open the pods & extract the beans. The plants mostly were no more than 6″ high & many of them were going over any way.

The Garbanzo beans (aka Chick peas) & the Lentils proved to be frost resistant last year so I’ve not bothered with those for the moment. Any way they are there more as green manure than as a crop to harvest. I found last year it was too much work to get a few beans & lentils. In comparison the Pinto beans are much, much more rewarding!

Sunflowers Tall at top of plot:

As you might imagine all the Sunflowers have now finished flowering & Gerry has even cut off dozens of seedheads for his birds. I started to pull up some of them but more than 3/4 of them remain. I haven’t pulled up any of the Mini sunflowers yet or the Little Dorrit ones. Gerry has harvested many of their seedheads as well. I’ve saved a few for my wife who likes to eat Sunflower seeds. A very popular pastime in Spain!

Tomato Mallorquin just harvested:

These are the last fruits of Tomato Mallorquin that had been growing outside in the soil just behind the shed. I picked them before a subsequent frost could damage them. I’m disappointed with this tomato as the fruits were small & very late in forming. Next year I’ll go back to the more traditional varieties of tomatoes. I think they need a GH to grow & fruit well. The one plant in the GH on the allotment has, eventually, produced much bigger fruits as well as better looking. Yet Gerry had a dozen plants in his GH at home & they were a disaster for him! I have 3 plants on my balcony at home; these have done better than the ones grown out in the open on the allotment but not as well as the one in the GH on the plot.

Carrots Autumn King before lifting:

Carrots Autumn King after lifting:

I was surprised to see the roots so forked! I’ve been told there are two main reasons why this should happen, 1: soil too rich/manure & 2: stony ground. Well the first certainly can’t be true as this bed has had no manure put into it in years as Gerry didn’t know of a place to get any till this year. As for stony, well this is more of a possibility, but I think a hard pan 3-4″ down is more likely. I dug this bed over after lifting the carrots & I encountered this hard pan a little way down.

Parsnips White Gem after lifting:

Much the same reason as for the carrots. I noticed months ago that the Parsnips were pushing out of the soil & some seemed to be growing on their sides. So I thought at the time that the bed had a hard pan a couple of inches down. Which proved to be the case.

Also this was my first time ever at growing either of these two crops. Advice on watering Parsnips & Onions changes according to who you ask! Some say they never water after watering when planting out while others say they water them like other crops! So confusing for a newbie!

Beetroots Bolthardy before lifting:

Beetroots Bolthardy after lifting:

I lifted these because I wanted to clear the ground & finish digging the bed over. There were in the same bed I planted up with Lettuce Tom Thumb. They also looked big enough to harvest & were unlikely to get much bigger even if I left them for a few more weeks.

I’m quite pleased with efforts of growing Beetroot this year as it is only my 2nd season growing them. I have one last bed at the very top of the plot but these won’t be ready to harvest for months I should imagine – if they are frost resistant, something I don’t know – yet!

Godetias at top of plot:

My wife likes these little plants a lot & most years I grow a few plants on the balcony for her. I also had a few this year but they didn’t do very well so I bought another packet of seeds which I sowed in a tray in the GH on the allotment. Unfortunately I could never seem to find the right moment to prick them out into pots to take home & put on the balcony. Eventually I decided to plant them out of the plot even though I wasn’t really expecting them to put on much of a show before the frosts killed them off. But it seems the warmer weather of late has saved them for the time being! As I’ve no photos of the view from the shed I’ve put this one on to end this instalment of the continuing saga of the allotment through the year!

Lots of photos for the last (probably) blog of the growing season on the plot. I may make up a last one sometime in November. I still have to make up one for Plot 12A!