Tag Archives: Games

Birthday Present

My son & his wife gave me a birthday present of a ‘Calla Lily’ (Zantedeschia rehmannii) which has dark purple, almost black, spathes. It’s about 30cm (12ins) high. For the time being it will stay on our living room table but in a couple of weeks it may well go outside onto our balcony for the summer.

I’ve never grown this plant before so I’m looking forward to growing it & seeing if I can keep it for a couple of years. I’m always loathe to throw away plants. I like to propagate them as well. It’s rare the plant I can’t get to reproduce in some way! Some propagate so easily they end up almost becoming weeds!

This last photo was taken on 26th May but it seems I’ve forgotten to put the date on it!

Spring & a new start to the growing season on the plot

Spring & a new start to the growing season on the plot

Yes, Spring has sprung in the NH (Northern Hemisphere) & we are making a new start to the growing season on the allotments! Have you been itching to get your hands dirty again? I know I have! But I have difficulty getting down to the plot I share with my friend, Gerry, from church.

At the end of of September 2015 he gave up his half plot to concentrate on his one whole plot. Two years before I’d also given up my half plot as I found I couldn’t manage it & Gerry’s 1 & 1/2 plots. He’d had a very serious operation & for more than a year he found it too much to spend more than a couple of hours a week on his plots. I’d also found my time was very much compromised with other activities – very often related to our grandchildren.

The last 6 months I’ve also had health problems & have had to make several visits to the local hospital for tests on my bladder. This is still ongoing & a satisfactory cure has still to be found.

In January it occurred to me I could plant out the onion sets I’d bought before Christmas in a seed tray in the greenhouse on Gerry’s allotment. Although I wouldn’t be able to plant them out for a few weeks I thought they would be able to make a start & gain a few weeks on the season. As it turned out they had to stay in the seedtray in the GH for much longer than I had thought at first!

I filled a seedtray/flat with compost to overflowing & filled the tray with the biggest of the sets:

They must have spent the better part of 3 months in the GH! The onion sets were really crying out for more space by the time I was able to finally plant them out!

I’d also sown a 2nd tray with the remaining onion sets – these were smaller than the first sowing but, even though they hadn’t grown nearly as much, I planted them out on the same day as the first sowing & the Garlics. It will be interesting to see if there is much difference between the plantings at harvest time.

Back in the autumn of 2015 I started to dig in some horse manure that Gerry manages to get hold of. I was only able to do half this bed before the rains started & I started with my waterworks problems. So I used this half bed for my Onions & Garlic.

The Garlic weren’t nearly as bad:

I planted out the Garlic cloves alongside the Onion sets. Even though it’s not easy to see they are on the left of the photo, alongside the piece of blue string:

At the same time as I sowed the Onion sets & the Garlic I also sowed a tray of Beetroot seeds. They say you shouldn’t disturb the roots of Beetroot & for that reason they are usually sown “in situ”. Yet I’ve never found much in the way of problems doing this. I’ve been doing it for the 7 years I’ve been working with Gerry on his allotment plots as well as the 2 years on my own plot. I’ve sown some directly in the soil each year but I can’t say the results have been all that good.

This year I bought a big packet of Beetroot seeds in a mixture. There are yellow beets as well as white & one with pink & white rings. There are also long ones & short ones so it will be fun later when it comes to picking them!

The half bed that didn’t get any manure I’ve filled with the Beetroot seedlings & two rows of seeds:

I got enough seedlings to fill two half rows along the length of half a bed. I know they are very difficult to see but I assure you they are there! (on the right):

I sowed quite a few seeds in the two rows on the left but they haven’t germinated just yet:

At the present moment that is all I’ve done on the allotment for this year. I know Gerry wants to sow his potatoes but he heard Monty Don on the BBC Gardening World programme advise people not to be too quick in sowing them as the soil is still quite cold, so he has put off sowing them for the time being.

I don’t have any potatoes to sow. I put in a few Strawberry plants in the bed in front of the shed under the apple tree but I don’t know how well they will do this year. I weeded them a bit the last time I was down on the plot but they probably need a bit more attention.

In the same bed there are lots of spring bulbs that are presently flowering:

In a few weeks’ time the bright red Tulips will also be flowering – as they do every year!

Well these bright spring flowers mark the end of this first blog of the year on the allotment. As there is only the one plot this year the updates will be less frequent, (do I hear a sigh of relief?), but I will write an occasional blog & show you our work & produce.

Happy gardening everyone!

Some beautiful Amaryllis for March.

Some beautiful Amaryllis for March.

I thought I would show you some of the beautiful Amaryllis have been flowering on our living room table for the last 3 months:

So let’s start with this wonderful view of flowering Amaryllis bulbs on our living room table taken today, March 7th 2016:

(The flowers on the table in front of the Amaryllis are plants given to my wife for Mother’s Day, a Kalanchoe, from our youngest son, a Pansy in a tiny painted pot from church (given to all the ladies in church) & some Lilies from our daughter.)

Another photo from today of one of the Anglo-American hybrids, the fifteenth to flower since the beginning of the year:

This photo is of one of my previous hybrids that began flowering in 2010 & have flowered every year since:

The next picture is of one that may possibly be an offset of ‘Pinky’ that is flowering for the very first time

A lady on another gardening forum I also post on sent me an Amaryllis bulb, 4 or 5 years ago, called ‘Pinky’, a very apt name as it’s a lovely light pink. The flowers are much more open, having lost their original trumpet shape. As this flower has only just opened today it may not yet have reached it’s maximum size & aperture. The original bulb must be one of those that hasn’t flowered this year so far.

Here is a typical red, but I found it to be the darkest of all my reds to flower so far this year. Again this is a bulb from the previous sowing of 2006. That doesn’t mean to say it IS one of the original bulbs that first started to flower in 2010, no, it may be an offset of one of those:

Another one from previous years. The comments I’ve made above could well be applied to this one as well:

Anglo-American hybrids:

This one however is the very first of my Anglo-American hybrids to open its very first flower ever!:

It opened while still on the bedroom windowsill where it has spent half the years for the last 3 years. The other half of the years it spent on Gerry’s allotment. All my Amaryllis spent six months of the year on the allotment & the other 6 months on our windowsills in the kitchen & two bedrooms. In the UK they can’t be left outdoors from the middle of October to late April or early May.

I’ve written a blog on the origin of these hybrids which you can read about in my  previous blog.

Here is a picture of the first 2 Anglo-American hybrids to open side by side in the middle of January:

Here is another beautiful Anglo-American Amaryllis, it’s been in flower since the middle of February:

This one I took on Leap Year’s Day, 29th of February:

Here are several of them flowering on our living room table at the start of February this year:

These are some of the older hybrids flowering in our living room a few days before those above:

One of the Reds is in a bowl on the living room table as one of the flowers accidental broke off as I was trying to get it out of the kitchen windowsill.

My wife got me to change the old Venetian blinds & put up some curtains in their place last November/December. That now makes it very difficult to move the plants in & out of the window as well as making watering them much more difficult for me!

Well I hope you liked seeing these wonderful plants in flower in our living room this year. I think you will agree they look much better en masse than just one or two on their own! Remember also ALL these plants are grown from my own seeds, NONE of them has been bought. Since the first seeds sown in 2005 to now I’ve never been without a few plants in flower for around six months a year every year!

I’m going to add just one last photo I took a couple of days ago of the biggest flower of them all – it measures 8 (EIGHT) inches/20cm across! I took a photo with my hand in front of the flower with my fingers stretched as far apart as I could possibly manage & I barely reached the tips of the petals on either side:

Same flower but with my hand removed!


Difference between Anglo-American and Ordinary hybrid Amaryllis

The Difference between “Anglo-American” and “Ordinary hybrid” Amaryllis

As several of you ask about the difference between my “ordinary” hybrid Amaryllis & my “Anglo-American” hybrids I’ll explain again, though I think I’ve really explained a few times before!

(The 4 scapes (flower stems) in the middle of these two photos are “Anglo-American” hybrids, only the end two are older, “ordinary” Amaryllis hybrids)

The “ordinary” hybrids are the ones I’ve been growing from my own seeds since before I joined GoY back in April 2009! (One of the first blogs I ever wrote on GoY was about growing Amaryllis from seed!)

These came about because in October 2001 I bought 3 Amaryllis bulbs from a Dutch trader, in what was the very first International Market held in Huntingdon. These were unnamed, unpackaged bulbs I bought in a street market. These bulbs grew & flowered for several years until one year it occurred to me to try & cross-fertilize them & try to get some viable seed. I’d tried some years before, when we still lived in Cuenca, Spain. At that time none of the seeds germinated. This time I had an overwhelming number of seeds that germinated!

After 4 years these flowered for the first time & I used a photo of me standing in front of them all, (now we call them “selfies”, back then we called them “self portraits”!), flowering on our living room table, as my avatar photo on GoY for many years.

Then, in 2012, a lady, on another gardening forum I also post on, sent me some, unsolicited, pollen from her Amaryllis. As I had some in flower when it arrived I tried cross-fertilizing some of my plants with the pollen. Only one bulb gave me a couple of seedpods full of seeds. I sowed some & sent some to the lady in the USA who’d sent me the pollen.

(Unfortunately she has never told me if she sowed them nor if they have grown or flowered for her :-(( )

When these germinated I thought I need some way of identifying them in the future as they all look a like & to be able to send a “progress report” to the lady in the USA. The name “Anglo-American hybrids” came to my mind, as, after all, the pollen came from the USA but the original bulbs from the UK.

So there you have it – in a (rather big) nutshell! – why some are just simply called “Amaryllis hybrids” & others are called “Anglo-American hybrids”.

Of the “Anglo-American hybrids” I currently have 4 bulbs on our living room table, one of which has opened its first flower today for the first time since sowing 4 years ago! There are 3 more in bud, one of which will flower in a day or two, while there are two others which will still take a few more days. While, in the bedroom, on the windowsill, there are more bulbs with scapes at differing heights which will flower during February.

I have 20 pots of these “Anglo-American hybrids” in all! One has finished flowering, one is opening today & several more will be opening their flowers for the first time ever as the week progresses.

The photos I’ve included in this blog are for illustrative purposes really as most of my photos from the past few years are still locked away on the hard disk of my old desktop computer which I have no access to. :-((

Some of them, nevertheless, are relevant to what I’ve written in this blog. As they all have the date they were taken written on them you will easily see which photos relate to the present time.

Allotment 2015

Allotment 2015

There not having been much to write about the allotments during the winter/early spring I have only now gathered a few photos & something to write about.

Like previous years I plan on writing – at least once a month – a blog on the progress of things on the allotments I’m sharing with my friend Gerry from church. I’m back to sharing with him after having to give up my plot (12A) last September due to time constraints & the demands made on me. 

As April has been a an unseasonably warm & dry month I’ve been able to get down to Gerry’s allotments a little more often.

View from the top of Plot 58 on 1st April 2015:

Lets start with some colour from March:

Crocuses flowering under dwarf apple tree in front of the greenhouse:

Some Daffodils flowering in front of our shed:

In April lots of lovely red Tulips in the bed in front of the shed:

I’ve been able to do some sowings & some work on the ground. Gerry has done the “Lion’s share” of the digging & has planted lots of potatoes.

Potatoes recently sown:

At the time of taking the photo I didn’t know Gerry had planted his seed potatoes in these couple of beds that’s why the caption reads: Beds recently manured. All that was visible were remains of the horse manure he’d previously dug in!

I haven’t planted any at all though there is still time yet to put in 2nd earlies & maincrop spuds. Not all is lost!

Garlic ‘Marco’:

I planted out a few cloves of Garlic ‘Marco’ back in December in the bed in front of the greenhouse. Now they are growing nicely.

Leeks at the top of the plot with some Lettuces planted alongside them:

The day I went down to the plot with my son I had intended to dig up the last of the Leeks that I had transplanted from my old plot last September but I discovered Gerry had planted these Lettuces right alongside them! Digging up the Leeks would have disturbed the soil around the too much I thought & they might not survive. I therefore left the Leeks where they were. Oh well, perhaps we can save some seed from them to sow next year! At least we will be treated to some great ball shaped flowerheads for a few weeks!

I sowed a packet of Broadbeans in toilet roll tubes:

As well as some Beetroot seed & Lettuces – 2 different varieties in the greenhouse.

Broadbean plants before/after I’d planted them out:

Beetroot ‘Bolthardy’ before/after I finished planting them out:

The Beetroot germinated very well & I’ve since planted it out on the plot. In fact I made two sowings & planted them out with only a few days of difference between them.

Beetroot ‘Bolthardy’ 2nd sowing just planted out:

All these seedlings were planted out in a raised bed I made up on Plot 58 between November 2014 & March 2015.

As the Lettuce hadn’t germinated I had none to plant out! One of the two trays of seeds has produced a very few seedlings which for the present are still in their tray. No more seeds seem to be germinating though.

After planting out the Beetroot I sowed a couple of rows of Lettuces directly into the soil this time of both varieties.

I also sowed a couple of rows of Beetroot seed as I have several packets of seeds still:

(My brother has since given me another packet!)

View from top of Plot 59B:

Mixed runner beans just sown at the base of the netting on the plot division:

Jonathan hoeing red onion bed:

I’ve even “roped in” my son, Jonathan, to give me a hand. He is my youngest son, he’ll be 38 this year. He hasn’t helped me on Gerry’s main plot, 58, so far that’s why the only photo I managed to grab of him was while he was busy hoeing the red onion bed near the end of Plot 59B, Gerry’s half allotment.

The first day he came down with me he helped me get the green netting on the plot division between Gerry’s half plot & his neighbour’s plot set up much better. It’s now stronger & better held up than last year. I don’t have any photos of this work as I didn’t think to get “before & after” photos. Though the after ones I can get any time now, obviously! I could even dig out (excuse the pun!) some photos from last year where the netting is quite clear but I doubt anyone would be interested in seeing “before & after” photos of some netting!!!

He also helped me with the raised bed we have made up on Gerry’s side of the plot division. This is something I’ve wanted to do for several years but had neither the time nor the wood with which to do it. Using some of the planks from my old plot we were able to make it up.

Raised bed beside plot division being made up:

Raised bed beside plot division now finished:

Some months ago we changed the flooring in our flat. We had had vinyl flooring since we moved in in 2001. We put vinyl flooring down instead of carpeting as we had 5 little dogs. A few years ago the last of the dogs died but we didn’t change the flooring. During the last 3 months of 2014 we decided it was time to change the flooring so we started to buy carpets which I, & one of my brothers, put down. We then kept the old vinyl to put down on the allotments. During April I covered most of the paths on Gerry’s half plot with this vinyl making a waterproof access to any of the beds.

Vinyl covered paths on Plot 59B:

Potatoes just planted out:

Here you can see the vinyl flooring on the paths either side of this bed of potatoes. Unfortunately there won’t be enough to cover much of Gerry’s main allotment. All the paths are approximately the width of the rake head +/- 12″. This just gives me enough room to turn face forward across the width of the beds so I can reach the centre from either side without having to step on the soil when it is wet.

Views of the apple tree over shed:

This cooker, perhaps a ‘Brambly Seedling’, is now starting to flower so I took a couple of pictures which will serve to close this the first blog on the allotments I share with Gerry for this year.

The apple flowers are so pretty when seen close up I thought I’d take a really close up photo:

Next month I hope to be back with the goings on down at the plots. Till then “Keep on gardening!”

Pumpkins on our allotments 2014

Pumpkins on our allotments 2014

I grew a few Pumpkins on my allotment & a few on Gerry´s this year but they didn’t do nearly as well as last year’s. 😦

On my plot I had one or two plants growing in the Runner bean bed! I imagine the seeds came from the compost I dug in before I put in the beans. I remember pulling out more germinated seeds as I didn’t want a lot of Pumpkin or Squash plants growing in the bed & taking up all the moisture from the beans. One Squash plant grew & produced some fruits, which I gave to our daughter.

I’m not sure if there were 1 or 2 Pumpkin plants as the runners they produce become so l-o-n-g they had to be put on the empty bed beside the runner bean bed. I’d emptied the bed of Beetroots that had been growing there & had nothing more at the time to fill it with. I laid the runners down on it & they grew happily there the rest of the summer. If I hadn’t given up my plot they might still be there!

I managed to get about 4 Pumpkins I think from my plot which I gave to our daughter for the grandkids!

++++++++++++++++++++++++++++++++++++++++++++++++++++++++++

I also sowed a few plants on Gerry’s allotment, in the bed close to the division between his half plot & his neighbour’s half plot.

Lots of pictures for so little a thing! 🙂

Amaryllis, “Red”, has begun showing its 1st bud!

Amaryllis, “Red”, has begun showing its 1st bud!

One of my Amaryllis,“Red”,has begun showing its 1st bud! It’s an offshoot of the mother bulb that I haven’t removed from its pot yet. I was cutting off the remaining leaves of all the bulbs that line our bedrooms & kitchen windowsills when I discovered it.

1st Amaryllis bud of 2014 in our bedroom window:

Another photo of the 1st bud of 2014 in our bedroom window:

I have about 50 pots with Amaryllis bulbs that I’ve grown to flowering from my own saved seeds. Most of them are in 15cm/6inch pots. Most of them have several offshoots growing in the pots as well, still attached to their mothers. I wanted to remove them from their pots & pot them all up individually this year, to that end I watered them all for the very last time on the last day of August 2013 then I moved them into the greenhouse on the allotment. All the pots of Amaryllis spend 6 months of the year on the allotment & the other 6 months of the year on the windowsills of our flat.

First Amaryllis bulbs brought back home:

As I have a label in the pot I know it will be red. It’s one of my seedlings that began to flower about 5 years ago. It doesn’t have a name but only goes by its colour. All the plants you see in the pots in the photos were grown from seeds I saved 8-9 years ago when the original 3 Amaryllis that I bought in the autumn of 2001 flowered for the last time.

Amaryllis stacked in tiers in our bedrooms windows viewed from the outside:

Last of Amaryllis bulbs brought back home from their summer on the allotment:

I originally bought a pure white, a pure red & a red with white stripes from a stall at the first international market week we had here back in 2001, (now an annual event), but they were loose unmarked bulbs, apart from the colour of course.

Amaryllis: The original 3 colours flowering in 2007:

They had no names. They flowered the 1st & 2nd years with me but the 3rd year the white one grew but didn’t flower. The other 2 did flower. The following year the white one bloomed for the last time. All three bulbs were living in the same plot for at least 5-6 years. I found a photo of them in the same pot in 2008 with offshoots.

Amaryllis: the Red one with a White stripe where you can see seedpods behind the flower:

I cross pollinated the flowers & ended up with so many seeds I didn’t know what to do with them, but that was back in 2007. I sowed the seed that same summer & was embarrassed with the number that germinated!

I’m going to add one photo from each year showing the progress of these seedlings to flowering plants:

Amaryllis seedlings growing in a seedtray on the balcony in July 2007:

Amaryllis seedlings in 2008:

Amaryllis seedlings growing on balcony in 2008:

Amaryllis seedlings on kitchen windowsill in 2009:

The year the seedlings from these 3 plants flowered for the 1st time was in 2010:

Amaryllis seedlings in May 2010:

Amaryllis on living room table in January 2012:

Amaryllis on our table in the living room in March 2013:

Now they need transplanting as I’m only getting 2 flowers from many of the bulbs instead of at least four. It is not very noticeable as I’ve got at least 50 pots at present. They now flower at different times so I get a continuous succession of flowers! In 2012 for example I hardly had a month without at least one flower!

Cambridge Botanical Gardens (Compost Corner) 4

Cambridge Botanical Gardens (Compost Corner) 4

This is the last part of this series of blogs on composting – but I wonder now if it shouldn’t have been the first!

Why is it a good idea to compost?

Composting is a form of recycling that benefits your garden & the environment.

– Up to 30% of our waste can be composted.

– It reduces landfill & pollution.

– Without much effort, it can save you money.

Reasons to compost

Good soil is the key to successful gardening. Digging in compost helps your garden grow. It:

– Improves soil structure which helps drainage & aeration, encouraging healthy root growth.

– Encourages good populations of worms & other soil organisms.

– Improves soil fertility.

– Helps the soil retain moisture.

Composting saves you money as it reduces the need to buy:

– Chemical fertilizers.

– Soil improver.

– Mulches.

By home composting, gardeners can contribute to protecting the environment by:

– Reducing the amount of organic waste that goes into landfill sites.

– Reducing the need for chemical fertilizers.

– Eliminating the need to use peat as a soil improver, as compost is an excellent alternative. Peat bogs are among the UK’s rarest habitats & 94% have been lost. Reducing the demand for peat helps conserve these areas.

Reasons to recycle

– 75% of all rubbish gets buried in the ground.

– Our household waste is rising at an average of 3% a year.

– 80% of our rubbish could be recycled.

We need to break the trend of sending 3% more rubbish to landfill each year, although 80% of it could be recycled. This is bad for the environment & wastes money. Soon, there will be no land left where we can bury waste.

Sustainable living

You can help our environment by reducing waste through considering what we can re-use, what we can recycle & which materials can be composted.

I hope you will have found these blogs of help if you have been considering what to do about the mounting bins of rubbish we seem to produce every year. Have felt concern for the environment but had little, practical idea of how you, yourself, could do anything to contribute to its improvement.

These blogs may also be of help to gardeners who have practised composting their vegetable waste for years to see other ways of making their composting even more environmentally friendly.

Or who perhaps haven’t been too satisfied with the quality of their compost to see where they may be going wrong or to consider other ways of improving the quality of what they produce. Thereby increasing the fertility of their soil & the quality/quantity of the produce, be it in the flower garden or veg plot.

This is a repost of the blog I wrote 3 years ago!

Amaryllis – April blooms

Amaryllis – April blooms

Once again I have 3 Amaryllis plants flowering on the living room table! So far since the year began I’ve only gone about 2 weeks, if that even, without at least one bulb flowering on the table in our living room.

Amaryllis on living room table seen from where I sit at my computer:

Just today I brought 2 more plants into the living room. One came from our bedroom & the other from the kitchen. I took two that had finished flowering into the kitchen to put in the window a couple of days ago:

I still have a few more plants that have buds to bring in yet. So therefore I will have flowers into May – at least! Who knows if any more bulbs might flower before I take them down to the allotment in the middle of May.

In one of the pots I brought into the living room today I discovered another bud that is still only about 20-30cm high.

The bulbs that are flowering now are all different! The oldest of the 3 is mostly white with faint red stripes.

ALL of my Amaryllis are bulbs that I grew form seed I saved from bulbs I cross fertilized 7 or 8 years ago. The original bulbs were unnamed bulbs I bought in the 1st International Market held here in town for the first time in October 2001. I bought one pure white, one pure red & one red with white stripes. At first they each had individual pots but after a couple of years I planted the three bulbs altogether in one big pot. A couple of years later I decided to try fertilizing them to see if I could get viable seeds to grow my own bulbs.

Many years earlier I’d done the same in Spain. On that occasion the seeds never germinated. So I wasn’t overly convinced this time would be much different. I couldn’t have been more wrong! The seeds germinated like “Mustard & Cress”! I was embarrassed by the quantity that germinated! I ended up with at least 50 seedlings which flowered in their 4th year after sowing – that was 3 years ago! Now every year they flower & do it over a period of several months. I don’t do anything to “force” them to flower at a particular time – though I do know how to do it. I prefer them to flower when THEY are ready & not at Christmas for example.

A sister of mine was the one who started me down this road of growing Amaryllis back in 1982! She gave me a starter pack for Christmas 1981 which contained a bulb, a pot & saucer plus enough compost to plant the bulb up. I did so on Christmas Day 1981 & it flowered on February 26th 1982!

I was hooked! When we went to Spain later that year I took it with me & it loved the climate of Spain because it not only flowered profusely every year it also multiplied profusely as well! After a few years in Spain I bought a white Amaryllis & maybe a striped one, I’m not too sure about that though.

I haven’t gone a single year since that first bulb given to me by my sister without at least one, or more, of these lovely bulbs!

To cap it all a lady in the USA saw my flowers on another gardening forum I post on &, without consulting me first, sent me several tiny plastic bags with pollen from some of her own Amaryllis plants! I put some of the pollen on some of my plants that seemed to be ready for fertilizing to see if it might work. Several of the flowers were fertilized but only one plant ended up producing viable seeds. I sowed some of the seeds last year & sent the American lady some as well. I even sent a person in London some seeds. Those that were left over I sowed for myself!

Amaryllis: Anglo-American seedlings in our kitchen:

I refer to them as Anglo-American hybrids! Many of the seeds germinated & now I have two seedtrays with 15 little square black pots in each with a tiny bulb resulting from the cross:

There are also about 5 other of these pots that wouldn’t fit in the trays. So now I have another 35 Amaryllis bulblets! These will need another three years to reach flowering size! What am I going to do for space???!!!

We have 3 windows with windowsills in our flat & all three of them have pots stacked up to three high in some cases!

Amaryllis in kitchen window middle of January:

Amaryllis in kitchen window seen from the outside middle of February:

That’s not too much of a problem during the winter when most of the leaves have died down & they don’t block out too much light but once they finish flowering the leaves grow very long & with so many plants in the windows they shut out a lot of light.

Amaryllis in our bedroom window seen from the inside:

About the middle of May I take them down to the allotment where they stay till the middle of October when I have to bring them home again. I’ve done this for the past 3 years & will do it again this year!

Amaryllis 1st year on the allotment 31st May 2010:

As I discovered when I dug them up in October to bring them back home it was a very bad idea to plant them where the Daffodils were as the Narcissus Fly laid its eggs on the Amaryllis & the grubs burrowed into the bulbs eating out their hearts.

Therefore in 2011 I left them in their pots & put them on a makeshift bench where they spent the entire summer & no Narcissus Fly bothered them:

I did a similar thing in 2012 only I also used these mini-greenhouses we have behind the greenhouse. Again no problems with the Narcissus Fly!

About the middle of May I shall take all the plants down that have finished flowering for this year. They, too, will be kept far away from the Daffodils that are now beginning to flower outside Gerry’s shed on the allotment.

Last look back at winter on the plots – at the end of March!

Last look back at winter on the plots – at the end of March!

I thought we’d take a last look at the plots after the winter, (now that the Spring has supposedly sprung!), starting in January 2013:

Leeks & Lentils at beginning of January on Plot 12A:

View along Plot 12A from top, beginning of January:

View along my plot from the top, middle of the month:

Here are some photos from February:

Leek bed a month later:

A Before photo just prior to harvesting a couple of rows:

An After photo of the Leek bed once a row or two were harvested:

The same bed of Leeks but harvested on the first day of March:

Beetroot ‘Baby Solis’ harvested & chucked straight on the compost heap!

These poor Beets were totally useless even if they don’t look too bad in the photo.

Last year was a total waste of time & space for me trying to grow Beetroot! I’d sown MUCH more than in previous years but harvested practically nothing!

Middle of the month: Carrots & Parsnips sown:

Might seem a strange time to sow Carrots but I was itching to put some seeds in & thinking March was just around the corner & the weather would be quickly warming up (!) &, having many packets of Carrot seed & several of Parsnips, I thought I could risk sowing some now. “If they don’t survive,” I thought, “nothing really lost as I’ve plenty more I can sow later.” Just as well as they are unlikely to germinate after weeks of winter weather all through February & March!

A few photos of my plot, 12A, in March:

We had a couple of dry, if rather cold, days at the beginning of March so I took advantage of them to dig in the last of the manure Gerry had brought down a couple of days earlier. I wanted to plant my new potatoes ‘Rocket’ in this bed. I’d started to dig in the horse manure in the middle of February, just before the snow came down, but was unable to finish it till about 3 weeks later.

New/Early Potatoes ‘Rocket’ being planted out at beginning of March, 1st row:

New/Early Potatoes ‘Rocket’ being planted out at beginning of March, 2nd row:

Second bed from the far end of the plot being manured:

Unknown Potatoes planted out in 2nd bed from the far end:

These potatoes came from the online shopping my wife does. She ordered new potatoes & when we saw them they were already sprouting! I kept about a pound of them back that were more the size of seed potatoes & put them in the 2nd tray of ‘Rocket’ that I had chitting in the kitchen. I planted them out once I’d finishing preparing the bed about a week after the ‘Rocket’ seeds were put in.

Onion sets ‘Sturon’ just planted out:

Planting these Onion sets was almost the very last thing I’ve been able to do on my own plot:

Broadbeans planted out:

This was the last time I was able to do anything on my plot during March owing to the extremely cold, strong winds that plagued us all of the month.

I only had 15 plants that had been growing in cardboard tubes in the greenhouse on Gerry’s allotment. I was going to plant out the last of the seeds directly in the soil but I’ve been unable to find them!

*********************************************************

Gerry’s plot during the first 3 months of 2013:

This is how the year/month began:

Still here!:

Snow on the greenhouse!:

I tried to write the date in the snow on the greenhouse roof but it starting breaking up before I could finish:

There were several inches of snow covering everything!

Now a few from February:

Bed after being dug over:

I started to dig this bed over during a short spell of dry but frosty weather in December but I couldn’t finish it. I spent half an hour digging but got less than half done before I was forced to give up because of the intense cold.

This bed had bugged me for weeks but, finally, I was able to complete it! I felt very relieved when I’d finished! Now it has a pile of manure waiting to be dug in!

Bed of Leeks & Lentils near the greenhouse:

There are actually two beds chock-a-block full of Leeks & Lentils.
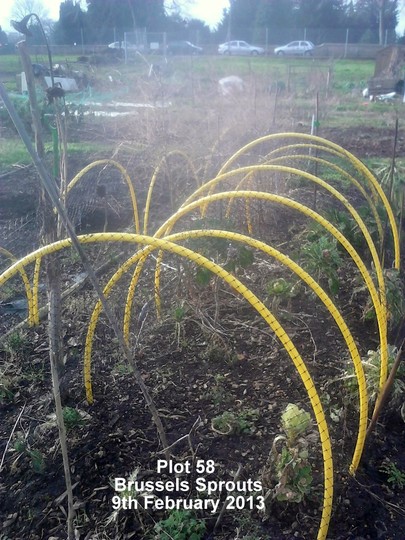
Brussels Sprouts:

I managed to harvest some sprouts form these plants but the majority came from the one plant that escaped the netting! Although these have been under the netting since I planted them out all the leaves have been eaten away! I saw no caterpillars on them – I don’t see how they could have got through the fine netting anyhow!

Victoria Plum trees:

Some lovely blue sky, quite a rarity during the last three months!

Daffodils & Tulips sprouting & rests of Gladioli:

This bed right outside the shed looked a real mess & was another of those things that bugged me for a long time! I feel a great deal of satisfaction once I’ve been able to finish whatever it is that bugs me!

Daffodils & Tulips sprouting & no more rests of Gladioli:

Some views of the plot in March:

The same bed as above but nearly a month later:

Onion sets ‘Sturon’ just planted out:

Onion sets ‘Stuttgarter Giant Karmen’ sown:

To finish this blog I’m including some Crocuses that sneaked into the allotment in some old compost I brought down from my balcony!

Some Crocuses under the dwarf apple tree in front of the greenhouse:

Not much to show for three months but then I’ve hardly set a foot on the allotments since October 2012! This has been mostly due to the record amount of rainfall during November & December which continued into the New Year. January brought a lot of snow making it totally impossible any work. February was very cold as well & I wasn’t able to do much & March has been so windy & terribly cold that I’ve hardly been able to do anything either.

I hope to start my monthly series of allotment blogs from the end of next month & I hope I’ll be able to show a little more progress than I’ve made over the last 5 months!